048E9E7FA7461AA968B0E08A6BA12AAB

Architecture photography tips

The beauty of photographing Architecture is that it provides a significant advantage over the other field of photography. The subject will remain at the same place for not only days but also for years and maybe decades. This means that there is always an excellent chance to improve your image if you couldn’t get it right in the first place. This is a great help, especially if it is in your city, or it is easy to revisit.

This doesn’t mean that it is a simple field of photography.

So before you go for the shooting day, you need to consider something in advance as many of photographers ask,

What are you going to look at?

Well, let’s put the ideas together as below;
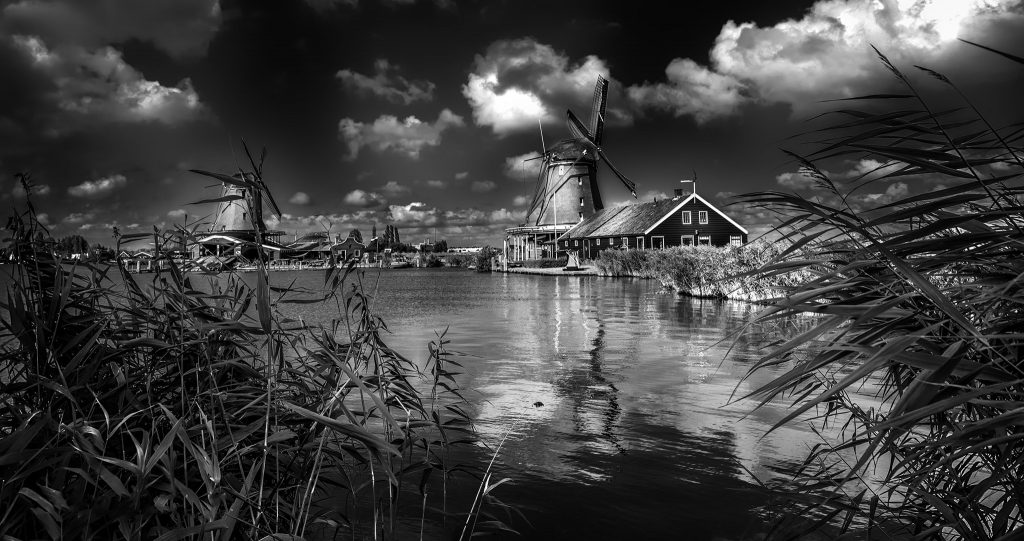
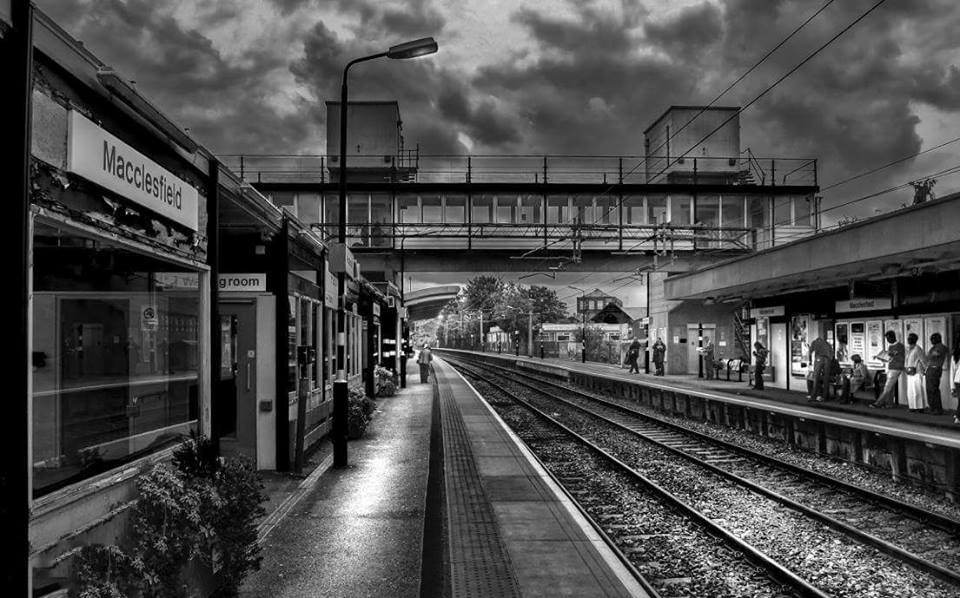
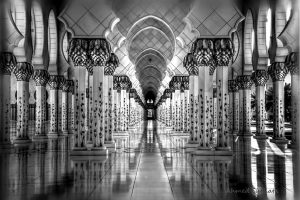
Wid angle look

Cairo-Sunset-pano-Cairo-tower

The above photo has been taken using a wide-angle lens that applied when you want to include more subjects in the scene. For example, famous landmarks surrounded by other buildings composed in a beautiful way considering lines, patterns shaps, and texture making it an exciting photo, that conveys to the viewer the sense of the city in this particular area. It is also essential to consider the shooting angle. I prefer it to be either from a very high angle or from a low angle. Avoid shooting from the eye-level angle as most of the people do.

Focus on the details

Madrid, Spain


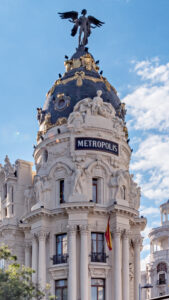
Have you ever been to a historical area with fantastic architecture and design, but because of the crowd and the tourists, you were not able to frame the entire building? In such a case, what I do not in order not to miss the opportunity is to go for the details. Yes, I search for the details in the building, but again, you should consider the different perspectives that should be a bit unique. That makes the difference.in this photo taken in Madrid, Spain.
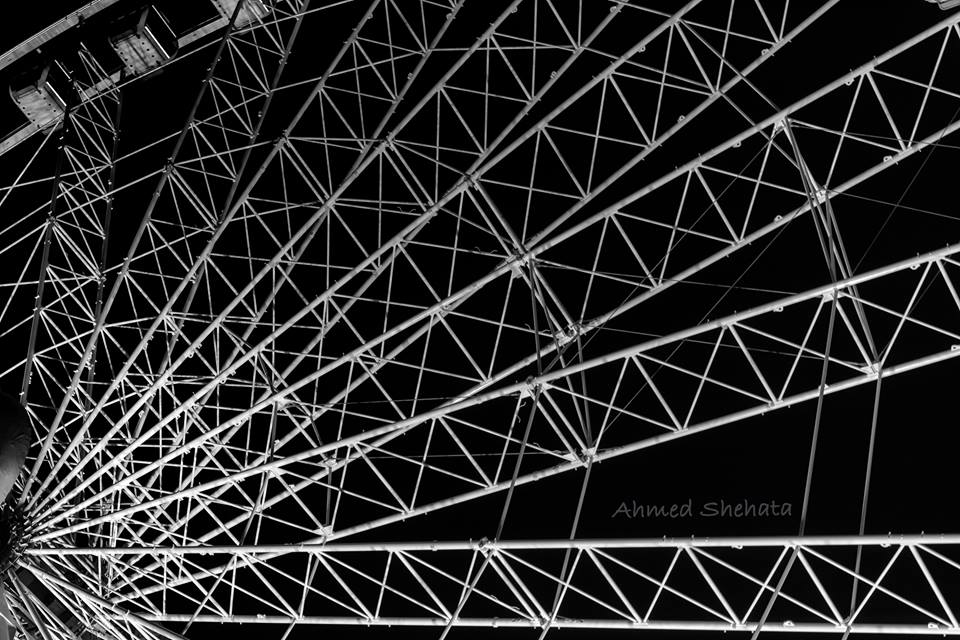
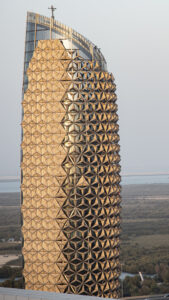
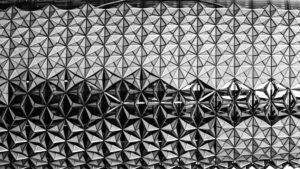
 

Forms and Patterns

Patterns
A pattern in Modern building


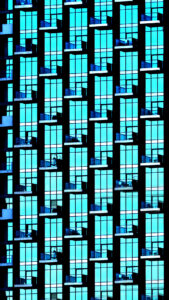
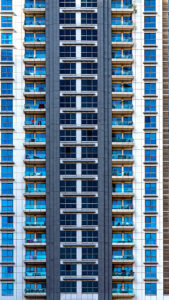
Modern architecture creates wealth opportunities. Usually, when we go shooting in the city, we look at the bigger picture, using the wide-angle lens, but most of these times, we miss the opportunities of seeing the beauty of details lie in the forms and patterns. I believe this needs you to be flexible in a way that makes you ready to switch from a comprehensive view to a narrow focus on a particular area where you may get a better frame. I have been shooting wide-angle in all my city shots until I realize that fact. Now I either go with two cameras or two lenses or take one lens for one objective at a time.


Abstract

The Building
Architecture, Abstract


After you taught your eye to look narrow to see other than the large areas in the scene by searching for the forms, Now it is the time to look at something is not easy to recognize, something could be not the subject itself, or let’s say part of the subject but can tell a great story, look at the shapes, the forms, the light, the shadow, etc.


Interiors, historical and modern.

Qalawun complex Cairo
Interior, Modern architecture


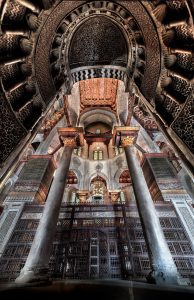
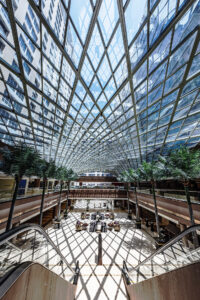
Historical buildings like worship such as Cathedrals or mosques are so rich with ornate. Look at the pillars, dome, and walls. With the modern interior, you want to look at lines, shapes, and colors.
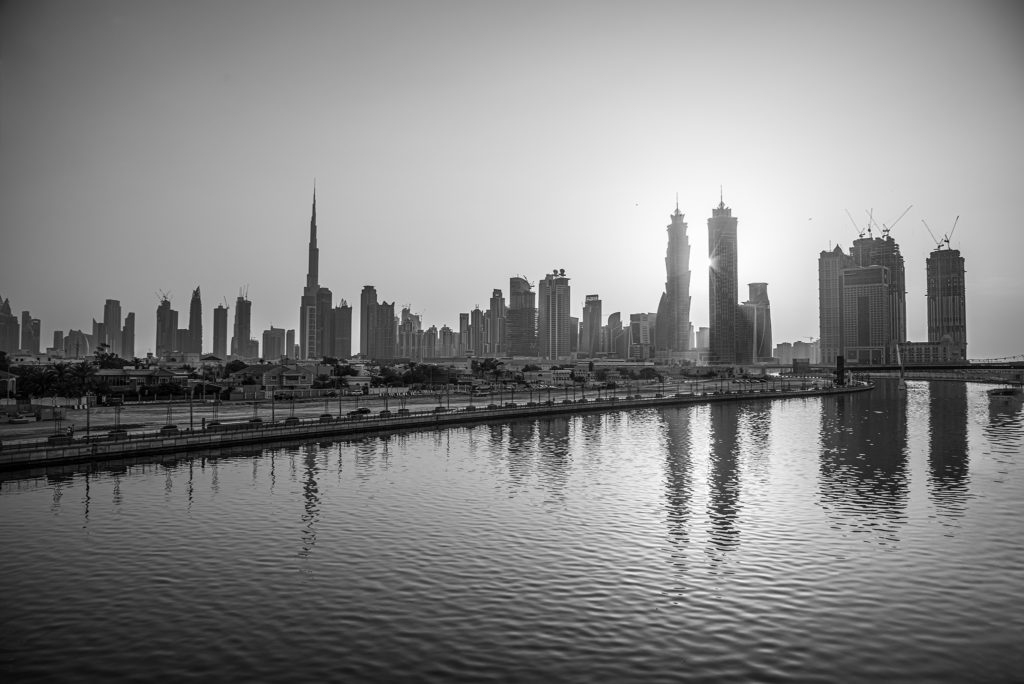
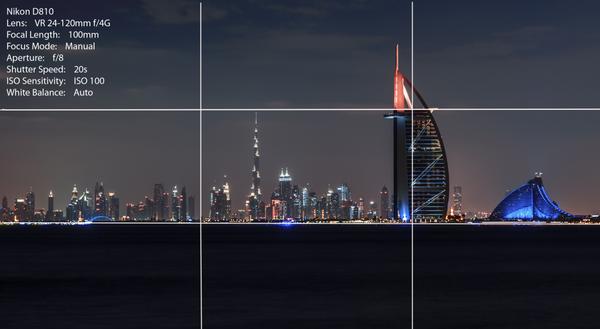
Landmarks

Framing Burj Khalifa, Dubai, UAE


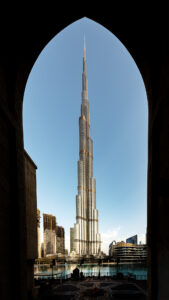
Photographing Landmarks is a quit challenge to the photographer, why? Since they are famous, everyone intends to photograph them, and you don’t want to end up with a regular photo as tourists do. It is so important to explore the site from many different angles to come up with an unusual look. Try to turn around the landmark, try to go to the backside, try to see from the other side, not from the usual places. Like this beautiful frame contain Burj Khalifa, as you see.
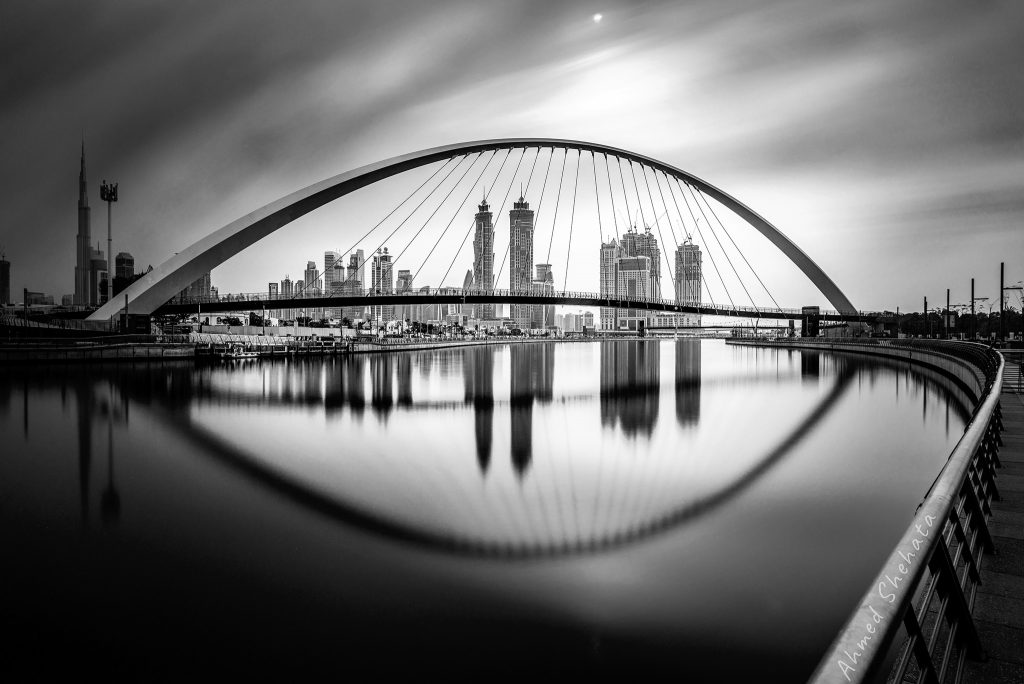
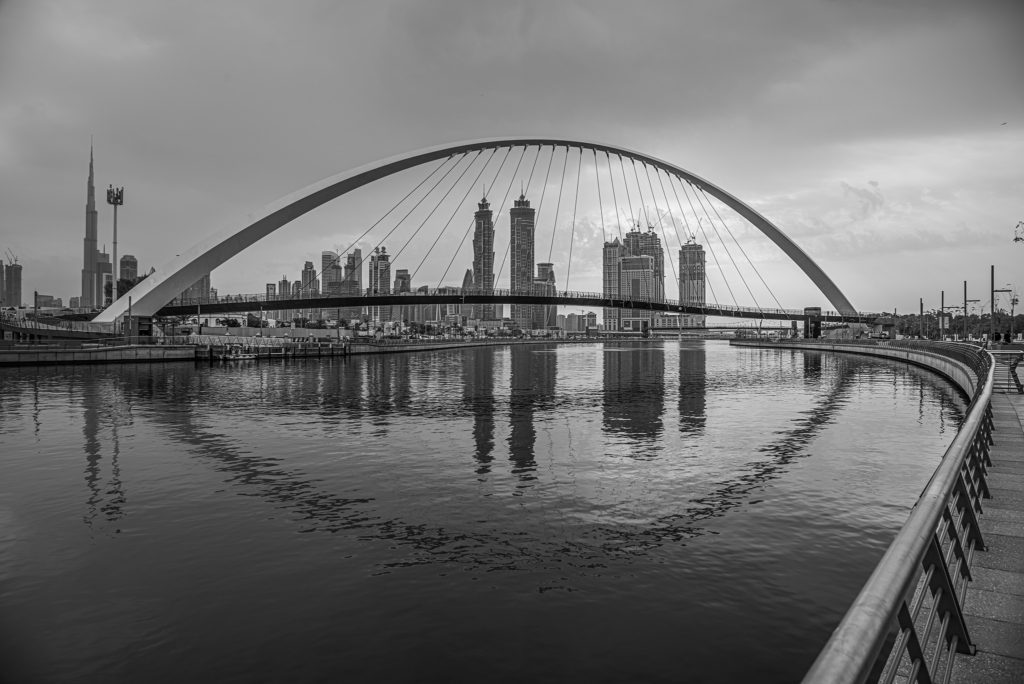
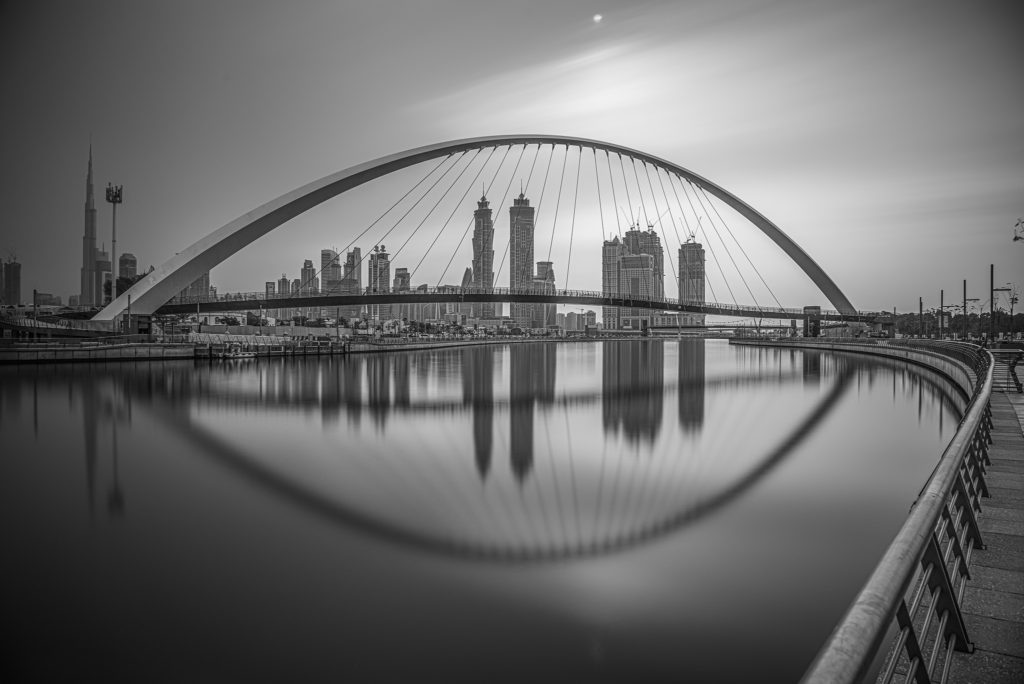
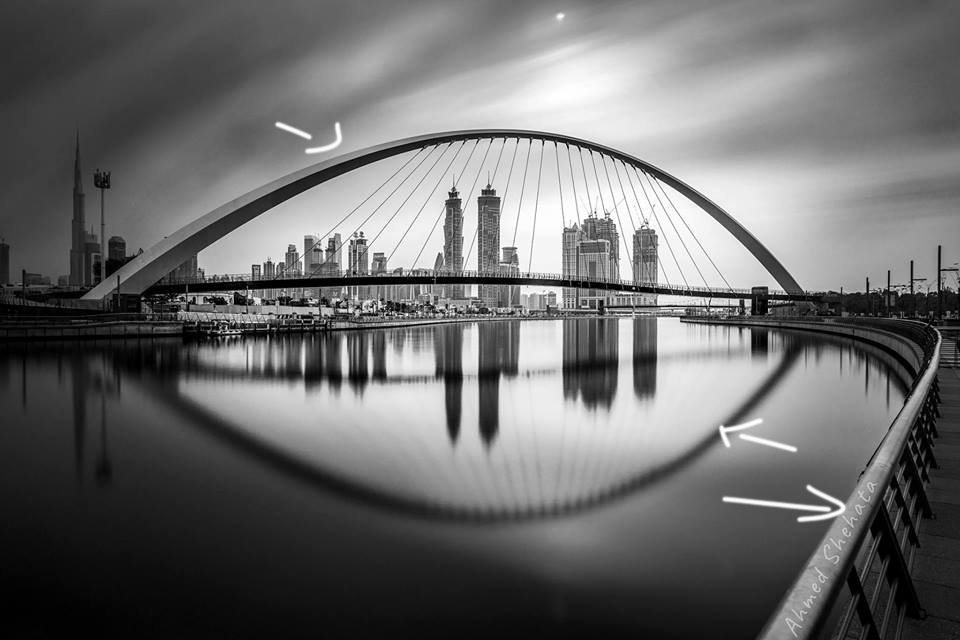
Bridges

Bridges are everywhere; they are wealthy with stories and full of life, people who walk, run, dating, and sometimes fishing too. Bridges take several shapes and designs, whether old or new. But since we are talking about architecture, so this will be our concern. the below picture has been taken in the Dubai canal

Notice  how beautiful is  the curve in the below photo 

Dubai Canal at nigh


Dubai- bridge black and white


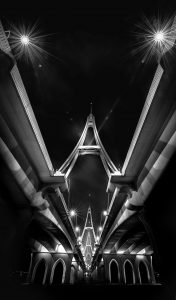
I took this photo under the bridge considering the symmetry in the design.
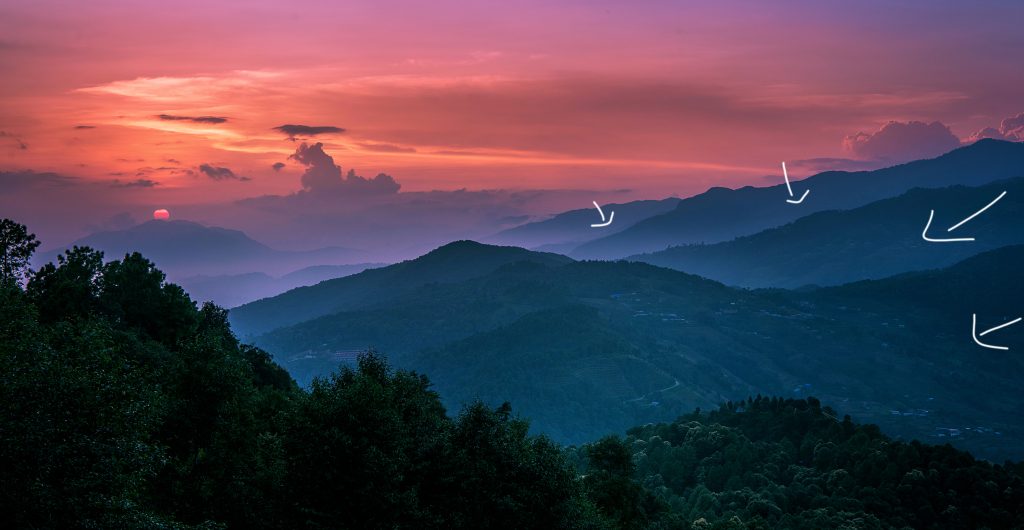
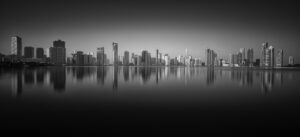
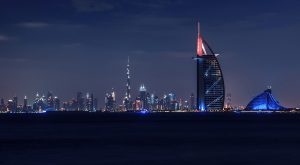


Skyline

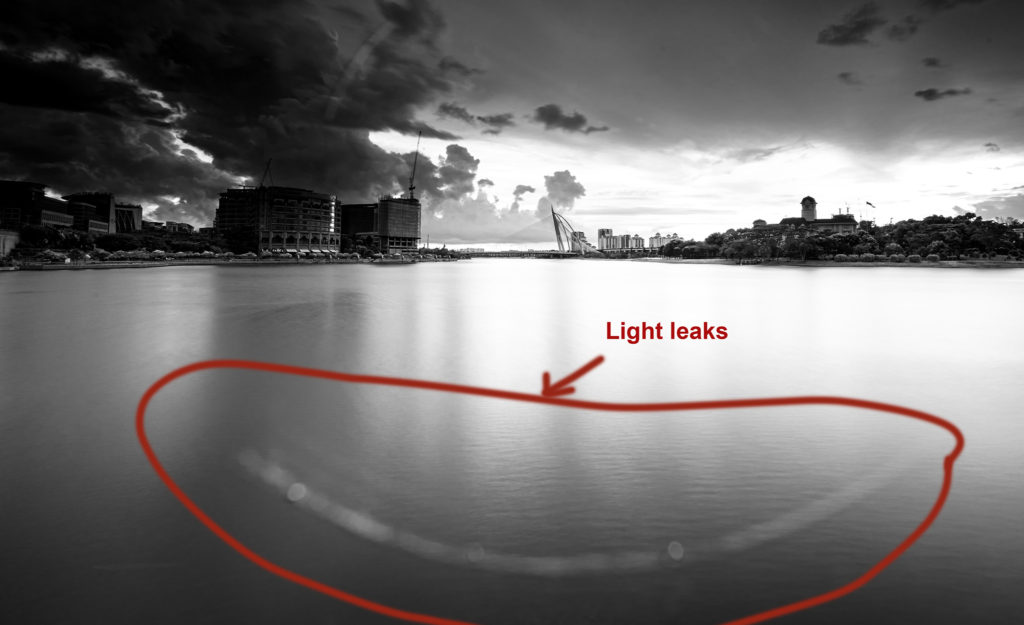
Back to the vast scene. Below are two photos, one for Sharjah lake, United Arab Emirates, and one for Dubai at night shows the landmark from the Palm, which is a bit far to contain all of these iconic landmarks in one scene.

Burj Al Arab and Burj Khalifa

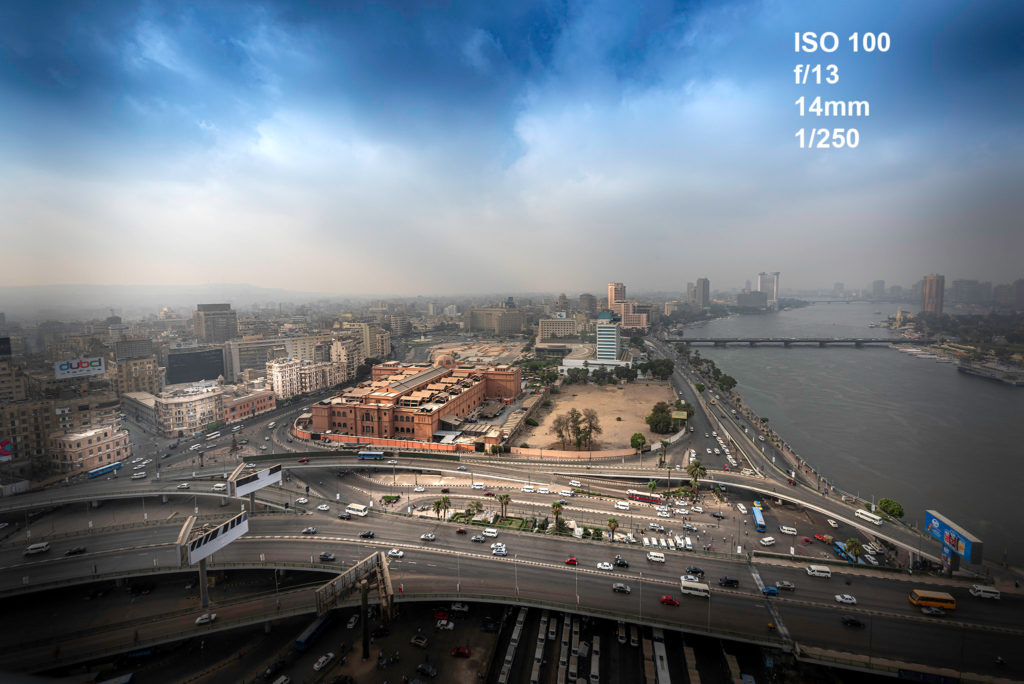
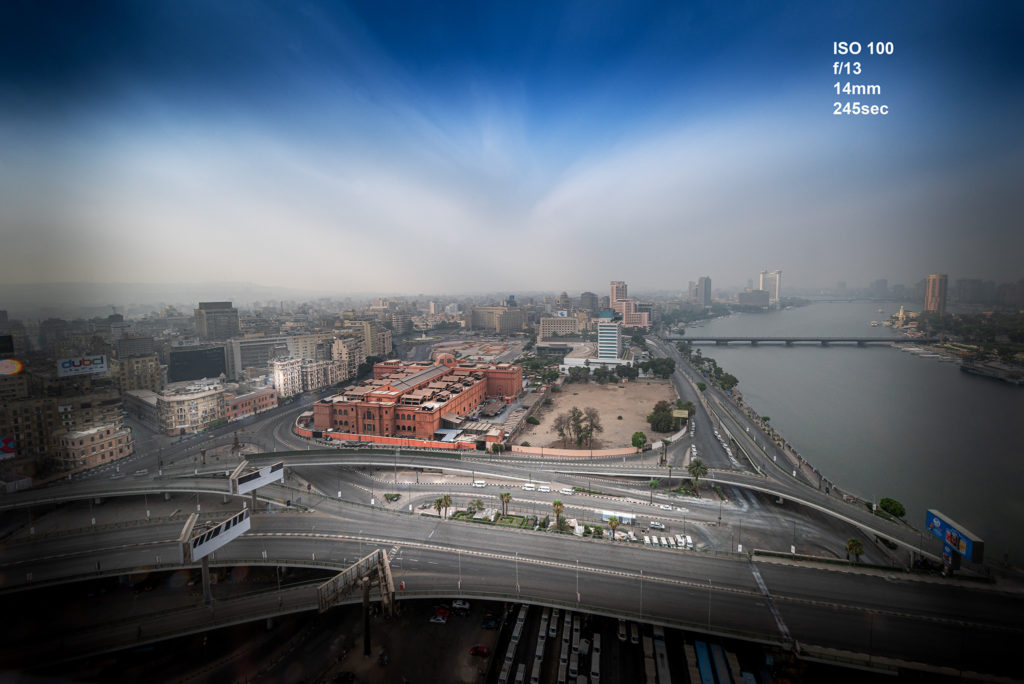
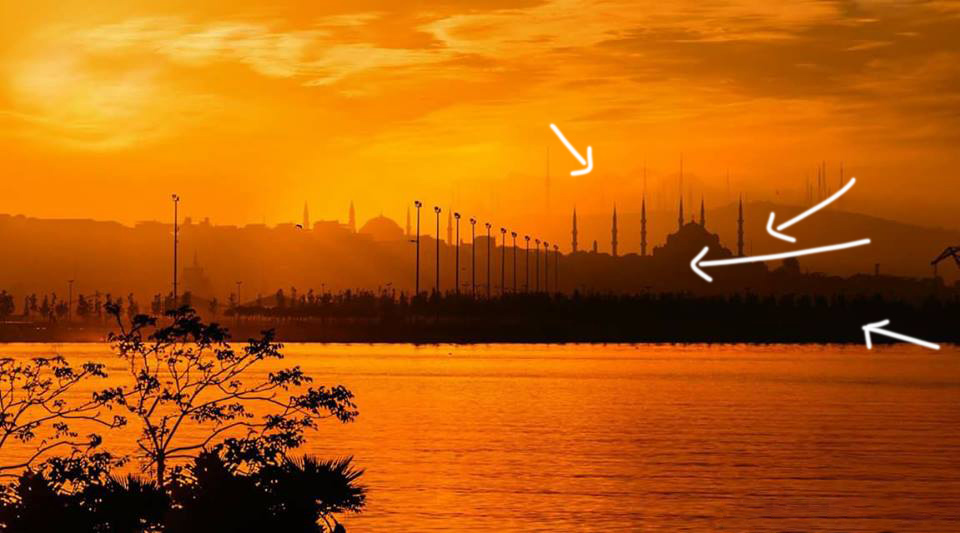
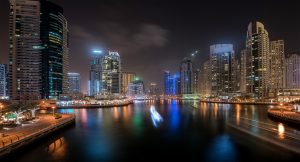
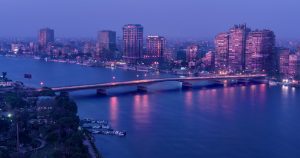
Cityscape and Urban landscape

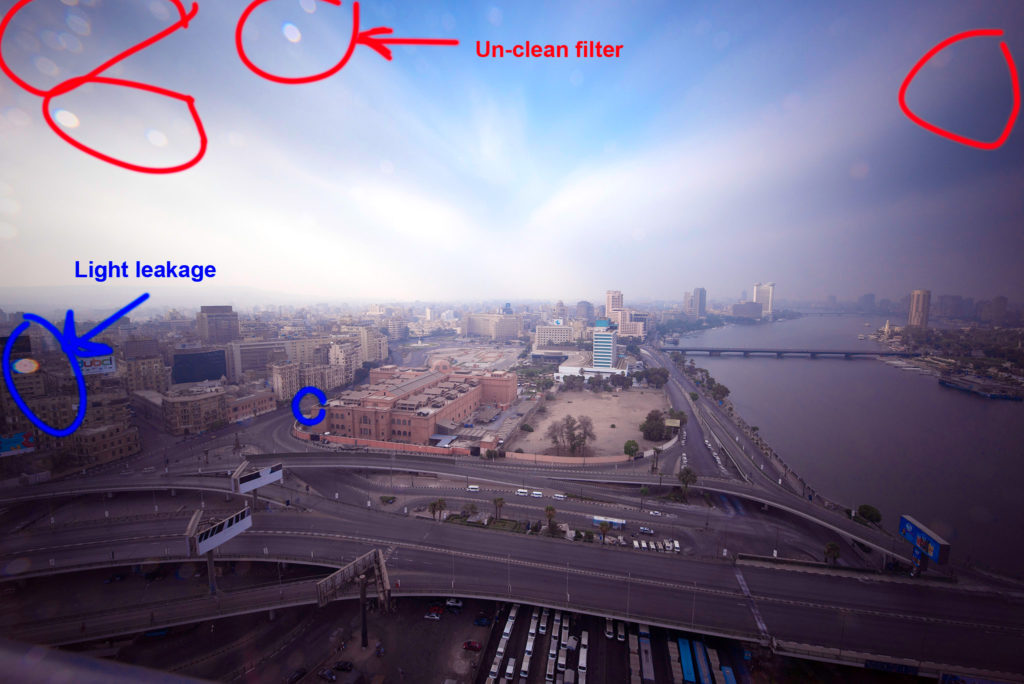
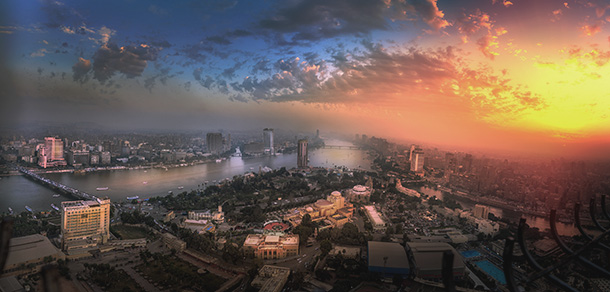
Photographers who live in cities, especially when they have a unique type of building design, whether they are old engineered buildings or new with modern and high towers, fall in love with cityscape and Urban landscape. blow are two photos from Cairo and Dubai

Dubai Marina night
Cairo Blue hours

Skyscrapers.

Skyscrapers


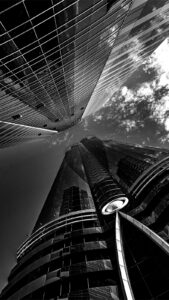
I’m a big fan of this line of architecture. Now, our eyes and mind learned to look at the details and neglect the subject also to look at the shaps, space, and forms. But what about looking UP. Most of the skyscrapers have different kinds of details at the top comparing to the ground, but this is not necessary. I can share with you what I feel when I look up watching two or more skyscrapers closed to each other. I think that I can hear a kind of conversation somehow going on between them up at the sky. You can keep them in color version, but I do like to convert it to black and white. Also, a long exposure will work very well with this kind of image as the stretched clouds will add a dramatic effect to the scene.

In post-processing and for amazing fine art pictures, you need an emphasis on the light and the shadow and consider the right and accepted direction.
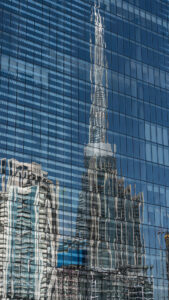
Reflection

This is the fun part. Try to do something different. Look at the building differently. Again this comes to train your eyes looking at different things in the scene away from the traditional and normal point of view. Here is what I mean. Most of the modern buildings are covered by glass. So look at the reflection of the other buildings on this surface. You will find many exciting things, and many unexpected results will come out. Check this photo. See the reflection of Burj Khalifa on the building along with its surrounded buildings. I would say now you have something interesting mixed with mystery somehow.

Burj Khalifa reflection

Architecture, especially when it is unique, is inspiring. That’s why, if you can’t create such beauty, I mean designing the building; at least we photograph them and share the vision with others.

I wish I give you a few ideas on what you can get out of your camera if you be a bit flexible in what you want to capture.


How to make Black And White Photography?

Holland

No doubt, black and white photography is a lovely experience. It takes you to a different feeling. I prefer to convert many of my photos to B& W.

But before we dive into the topic, I heard people called black and white photos also Monochrome. So it is essential to know what Monochrome is, To simplify it, Monochrome is an image with different amount of light, but within one colour, that’s why it could be sepia, green, yellow or cyan. So, Black and white image is Monochrome, but, Monochrome is not necessarily black and white. Just a quick note.

When to go for B& W?

In my opinion, there are many factors where it is better to convert your image to Black and white.

1. When there are no interesting colours in the scene.

Sometimes you go to shoot a landscape, seascape or cityscape photos but you either miss the golden colour, or you get it cloudy. In such a case, you certainly won’t get any beautiful colour in the sky. Thus, my advice is to convert your image without thinking into B& W.

Bukhara, Nepal B& W

2. When the light is so harsh.

If you shoot at the middle of the day, you for sure will be losing the interesting colour at this time of the day. Besides, the harch light will create a kind of high-contrast between the tones. Such contrast is a great opportunity to make a good black and white image.

3. If colours distracting.

If you shoot an exciting scene and you found many colours, especially in street life photography, that colours annoying the eyes and distract it from the main subject. You may play around the colours and try to fade off them, but most of the cases you will find yourself converting the photo to B&W to keep they eye focusing on the main object.

4. When you plan for it in advance.

When you get genuinely into B& W, you will fall in love with it. Once you know what to shoot, when to shoot and how to shoot with extra knowledge of B& W post-processing, you will reach to a level I would say” you now can see in Black and White”! Sound interesting isn’t it? Yes, you will.That is why you will pick your gears, and you will intentionally go for Black and white shots when you photograph Texture, Shapes, abstract, patterns, portrait or you want to create a dramatic landscape or seascape photos.

Black and White long exposure.

Long exposure plays a critical role in black and white photos, mainly when the scene includes either clouds or water or both together. The stretchy clouds and the silky water create a fine art photo. below are two pictures from Bukhara Lake in Nepal,

The above image has been taken with shutter speed 1/125 s

The above image has been made with a shutter delay of the 30s using ND filter

The Zone System.

Ansel Adams developed the zone system with Fred Archer in 1940. the system divides any scene into zones or sections according to the amount of lights and shadows within each area to enable the photographer to optimize the exposure during the image capturing and printing. The system has eleven zones from the pure Black to the pure white and in between the different grads of the grey referred to by the zone numbers. Which could be adjusted locally or independently (see the below image).

Post-processing Black and White image.

We can use any of the available software in the market like Photoshop, lightroom, Luminar4 which includes the Tonality Pro and finally Silver Efex Pro 2 for Nik collection.

Let’s see how to do that in different ways using the various software we mentioned and what the outcomes are.

Lightroom

Since I like to make the basic adjustments on LR, so, after converting the image into Black and White I edit it in two steps;

1. Using the Tone sliders:

I use the Tone sliders to adjust the three areas of tones, the Mid-tones using the exposure slider, which is ok as per the below photo, if you press (J), LR will show the white area in Red and The Black area in blue accordingly you can push the sliders in both to the end until you get the below result. Once you get there, it is the time to regain the details in the bright and the dark areas by the shadow and the highlight sliders as per the below picture. Now you have a kind of balance between the white, the black and the shadow.

2. The Black & White Mix

I use the (Black & White Mix) sliders to adjust the colour tones. Remember that the file contains the colour information, which means every colour will be represented differently in Black& White. So I Advise you to play around with these sliders. The good thing about the B& W Mix is the control over the image and the further improvement and drama it adds to the scene. Check the below picture and see how the sliders emphases the tone of the blue sky, the clouds and the mountain on the left side.


Photoshop(Camera RAW)

The same steps you can follow with PS camera RAW if you don’t have LR becuse they have the same engine. Use the Tone Sliders and the Black and White Mix sliders to adjust the tones and to gain a well-balanced and contrasty B & W image.

1. The Tone sliders

2.The Black & White Mix Sliders.

Photoshop(Adujustment Layers)

The below image shows the black and white adjustments layers used once you finish the basic adjustments in Camera Raw.


Silver Efex Pro 2

Silver Efex Pro 2 is a powerful tool. It includes many presets to be used as a starting point in the editing process.

You can use the system zone to adjust the amount of the light given to each zone locally. It would help if you played around with the sliders, Try also the Selective Adjustments, and the control points. That will give extra control as you will adjust only specific areas and not the entire photo.

So, Black and White Photography is inspiring and straightforward. Still, you need to understand how to get the right exposure as much as you can; you need to know about the zone system. In the post-processing, all the available software nowadays include the tone sliders where you can use it to create the contrasty image. Also, the B&W mix sliders do a great job, as shown above.

How to take long exposure photography

Why do many landscape and cityscape photographers go for Long exposure?

Dubai canal b&w

In order to know how to take a long exposure photo, let’s answer the above question first, I would like you first to see the two images below and find out the difference between both and your reaction toward each one of them.

I believe the long exposure gives you such kind of feeling you get when you see a fine art picture or paint whereas the other image could be captured by any cell phone with just a good composition.

As an artist, you always seek beauty in your photography, and that’s why most landscapes and cityscape photographers use the long exposure technique to gain such a result while no one else could create that unless he knows this technique. Look at the stretchy clouds and the silky water, have you noticed the vehicles have been disappeared? This is the magic of long exposure photography.

The above photos show how long exposure creates a beautiful motion effect in the waterfalls.

Black and White Long Exposure Photography

When you don’t have exciting colors in the sky, go for Black& White.

I have taken the above two images at the Dubai Canal on the bridge and while walking around, I found the below beautiful composition with the leading line to the bridge which as you notice, the long exposure created with the bridge reflection in the water a shape like an eye containing most of the back buildings within.

How to photograph Long exposure?

To understand how, you need to be aware of the many elements involved in long exposure photography. These elements are: Equipment, settings, Timing, configuration and many which we are going to explore in a bit high level of detail as the topic is vast, but by following the steps, you can start your journey.

Equipment:


1. Tripod,

Long exposure practically means that you are going to open the shutter for a long time than you usually do. Thus, you need to have a strong, steady tripod in the first place.

2. ND Filters( Natural Density filter)

Practically, the cameras are not designed for long exposure, by keeping the shutter open for a long time, the volume of the light that hits the sensor will be massive, and the picture will be by no doubt overexposed. That’s why the ND filter, in this case, comes to help to block the light and enable us to open the shutter for a longer time.

ND filters, Filter’s holder, adaptor rings and hardbag to carry and protect the filters.

But, you need to be careful while buying the filters, you need to get a good brand and the holder to be comfortable and practical in use. There are many kinds of filters that come with the gasket at their edges to prevent the light from affecting your exposure” Lee has this gasket” I, myself use Lee filters and NISI. Both are closed to each other in terms of quality and price. But to me, I have replaced the Lee holder with NISI as NISI is more straightforward and practical in use from my perspective.

Filter with a gasket to prevent the light leaks

3. Gaffer tape.

It is a tape used by professional photographers and available online. This tape is dark enough to prevent light leaks as you should use it to cover all the possible area could cause light leaks meanwhile it is clean and doesn’t leave any gum behind when you remove it.

4. Shutter Release Cable:

As you are going to shot a long shutter based photo and you have already fixed your camera on top of a steady tripod as mentioned earlier, you don’t need to shake your camera by pressing the shutter release button yourself especially if you know that you need to keep pushing for more than 1second to minutes. This remote will keep your camera static.

The Moment Of Truth: How to shot for long exposure?

Now you have your camera set on the steady tripod, attached the shutter release cable remote, fixed the filter’s holder on the lens, and you are ready to go.

Before you attach the filter you need to get a proper shot with proper exposure.

  1. First of all, don’t forget to get the best composition you can because it is essential to plan your shot as it will be a long exposure. Your shot has to have a purpose in your head in advance.
  2. Turn lens stabilizer off in your camera( your camera is fixed on the tripod, you don’t need the stabilizer)
  3. Adjust the focus preferably to be manual. Meant, you need to turn off the autofocus to avoid keeping the camera trying to adjust the focus after attaching the filter.
  4. Chose the right F stop first, my favorite f stop is between f8 and f16. This does give me the sharpness I need and great depth of field.
  5. Adjust the relative shutter speed accordingly to give you the right exposure.
  6. Don’t forget (the lower the iso, the lower the grains/ noise and the sharp is the photo. It is preferred to be 100 or lower).
  7. Once you have the right exposure, shot the first image. this image will be your starting point.
  8. Now it is the turn of the filter’s job. Use the Bulb Mode to control the shutter speed. (this mode is beyond the 30 seconds shutter time) Now you need some math to calculate the number of stops you need to add to the shutter time to compensate for the missing light. To make understandable, if your shutter speed on the photo you have taken in 7 1/125″ and you intend to use 3 stop ND filter that means you need to open your shutter further by 3 stops meant your shutter should be 1/15″ and if the filter is 6stops, you should lower the shutter by 6stops to be 1/2″. However, there are many apps for exposure calculation in the Apple store and Android that gives you a quick estimate. No need to memorize any configuration, but you got the idea.
  9. Once the Shutter speed is set, shoot your first photo with the filter, I take more than one shot with the same exposure and then start to play around the f stops and the ISO. This will help you during the post-processing.

What about the Mirror Up technique?

Sometimes photographers use this feature to avoid the blurring caused by the camera shake due to the movement of the mirror up and down while pressing the shutter button. Such functionality is usually followed when there is a telephoto lens even with a heavy, steady tripod.

I don’t remember how many times I have used it. only once or twice because the blurry in the picture is hard to be noticed. However, it is your choice.

Mistakes you should avoid!

  1. light leaks: To prevent the light leaks like what you see in the below photo, you need to block all the light would reach to the sensors other than the light trough the lens/ the filter so you need to check if the filter has no casket, you need to cover the space between the filter and the lens by gaffer tape. Another area where you expect to get light leaks is the camera viewfinder, and there is always a piece of rubber either built-in or mobile to cover the viewfinder for this purpose. Make sure to have it block the viewfinder or else use the gaffer tape if you missed it.

2. Dust, dirt on the lens or the filter, always keep your equipment clean as possible as you can. A piece of soft fabric will be your rescue in this mission. Before you shoot, make sure that all the glasses are clean and shining.

Finally, feel free to play around the F value and the ISO, you can make a bracket of three pictures and blend them and examine them. It may end up with something new primarily if you use the luminosity mask technique to get the High Dynamic Range.

If you like my blog, please subscribe or leave a comment below.

Question! In your opinion, Is the night photography long exposure?

You can also check (Master The Composition )

Master the Composition (Part 3)

Pattern, Textures, Anchor points and the Rule of Odds.

Pattern

It is just a repetition of lines, shapes curved, etc…. something repeated in a very systematic sequence to create a sort of graphic image. You will find such a pattern in architecture, with nature, and even people sometimes create some kinds of patterns.

Textures

Textures

Anchor point

In the landscape, it is essential to create a balance in the scene. One of these ways of creating such balance is the anchor points. Anchor point also keeps the viewer’s eye within the frame it takes the eye back and forth within the frame. Once it goes to the main object, it takes the eye back to the beginning of the photo. Meant to the anchor point.

Waterfall Nepal
IIn the above photo, the waterfalls lead the viewer eye to the mountain at the back but the rock at the bottom grab the eye back to the start.
UAE sunrise Fujairah
IIn the above photo, you see the horizon lead to the island. Also, the slow-motion in the water takes the viewer eye to the island too, but the rock at the bottom of the scene takes the eye back to the beginning.

Rule of odds

The Rule of Odds is based on framing your subjects in an odd number. You may have the object surrounded by to other objects. It has been proven that the eye gets comfortable with the odd number of objects.

It is not necessary to have the odd number of objects like 3 or 5, but sometimes you may have 4 or 6 number of objects, but they grouped to have an odd number of groups. The two photos show the difference between the four subjects and the three subjects as a group.


My advice always to everyone is to take photos as much as you can before, even going through these kinds of rules or tools. By doing so, you will train your eye to see and feel the beauty. Afterward, you learn those tools. Once you master them, you can break them. But it makes a huge difference when you break the tools that you know.

See Part Two

Thanks,

Master the Composition (Part 2)

In part 1 we talked about the tools of the composition and how to get the best frame using these tools. we talked only about the rule of third.

In this part we are going to talk about:

Framing, Layers, Leading lines

Framing

It is about how to create a frame like the above trying to surround the interesting subject with a frame to narrow the eye to the center of the s

Layers

Don’t you think that Layers create depth in the scene? the difference in the color tones and their levels creates a feeling like it is a 3D photo. you feel that you are inside the picture

Leading lines

 Curves

In the above black and white image, the curve creates a nice leading line to the center of the scene and then two other curves create somehow an eye surrounding the buildings and their reflection.

Check the above picture, you will find the edges of the lake act as curves leading your eyes to the end of the scene.

Diagonal lines


Straight Lines

In the above picture, the lines starting with a wide distance and it became narrow the more you go into the scene give you the feeling of the depth due to the perspective created by these leading lines. these leading straight lines take your eyes to the end of the photo.

See you in Part 3

Master the Composition (Part 1)

How important is the Composition?

I had a discussion with a friend of mine who is not a photographer when he asked me, why does the image taken by a photographer look better compared to the one captured by non-photographer? and that clicked something in my mind, it is about the quality of the picture, but what is the quality of the picture?. and how could we produce a high-quality image? Maybe the equipment is the key? or the skills of the photographer or the timing or maybe the quality of the light, the direction of the light. in reality, all of the above have an impact on the quality of the picture but what about the composition? let’s talk about the composition in more detail and find out if it is important to the image or not.you may believe as I do, that the good composition makes the eye, any eye comfortable with the image. that is the most important part. then you can talk about the rest of the elements that create the image. in order to understand the composition, we need to know something about what they like to call it rules. many photographers and I would like to call them tools or guidelines cause you can break them later but my advice is to master them first! 

In this series, I will try to cover as many as I can,

  • Rule of Third
  • Curves
  • Framing
  • Layers
  • Lines
  • Shapes
  • Patterns
  • Perspective
  • Texture
  • Anchor point
  • Rule of Odd

Rule of Third

The above picture has been taken in 2014 from Dubai Marina capturing the iconic landmarks (Borg El Arab and Burj Khalifa) from the seaside. you will find 2 vertical and 2 horizontal lines dividing the photo into 3 horizontal sections, 3 vertical sections, and 4 strong points. As per the rule of thirds, you should place your subject in one of these intersections where the vertical lines cross the horizontal ones. but when you photograph moving the subject or human or even birds or animals, you need to consider their moving direction or where they are looking at as below,

This picture has been taken in Georgia in 2016 in one of the hotels there. the statue if you notice look at the right side. so that it is better to keep the space in front of him not behind him. Notice that keeping space in front of the subject where it is direction seems to be, help to improve the composition.

Another example of the rule of thirds and the direction is in the above image which is actually has been taken by mobile phone(The same concepts apply to mobile photography). It doesn’t mean that you cannot break such a rule. sure you can. however, let’s stick to what we agreed on to master them all first and then go break them. at least you know what you break 😉
Next time we will talk about some other tools of the composition See you then. Have a nice photography time!

See you in Part 2

How to create a Panorama in 3 steps using Lightroom.

Cairo Panorama Sunset

Cairo-Sunset-pano-Cairo-tower

The photo has been taken from the Cairo Tower (Arabic: برج القاهرة‎, Borg Al-Qāhira) which is a free-standing concrete tower in CairoEgypt. At 187 m (614 ft), it has been the tallest structure in Egypt and North Africa for about 50 years. It was the tallest structure in Africa for ten years until 1971 when it was surpassed by Hillbrow Tower in South Africa.(Wikipedia)

The photo consists of 5 Portrait photos. I have tried with the security to allow me using the tripod as I wanted to take a long exposure sunset but they justified their rejection cause of the limited space at the top of the tower which was true. it was a bit crowded where it will be a challenge to use the tripod for a long time. Anyhow, I decided to capture the whole sunset scene using the panorama technic, I shot 5 photos with around 20%  overlap in order to cover all the information, then blended them together in Lightroom. 

just right click and select :-> photo merge -> Panorama.

Then, you will get this screen 

Just push the boundary wrap slider to be 100

And Finally, we obtain the below result.

After merging the five photos and obtain the above final image, export it to the photoshop and complete the post-processing. 

Have a nice photography time!

Feel free to leave a comment, like to know your insight.

See also (Master the composition)